
Page 2 of 2 •  1, 2
1, 2
 Custom Mike
- Posts : 273
Join date : 2015-01-26
Age : 60
Location : North Carolina 
 Re: 51 Chevy Custom
Tue Mar 17, 2015 2:49 am
Kitbash wrote:Custom Mike wrote:I don't have the testicular fortitude to chop a top yet
lol with all the other detailing you do it would be cake work for you bud. tis only plastic after all
The detailing part comes easy to me, chopping a top and opening doors....that part has always been a place I didn't want to go. But now that I have a hinge bending jig, I'm gonna try my hand at opening up some stuff, so a chopped top can't be far off for me!
 KitbashAdmin
- Posts : 276
Join date : 2015-01-25
Age : 54
Location : Georgia
Re: 51 Chevy Custom
Wed Mar 18, 2015 11:38 am
ok a bit further along on the chop process
did some rough sanding and if i were smart i would have added a bit more crown to the roofline as it would have made the job easier, but who said i was smart??? shurrup tina!! lol
as it sits, after the rough sand, i can see the depression i have to fill to smooth things out

also while i am at it i am going to remove the current molding and replace it once the chop is done with .020 round rod

front window molding is to be replaced as well

after a bit of file work to clean up the sides a bit i check the profile to see if it is heading in the right direction

yup, it is
now a closer look at the depression in the roof
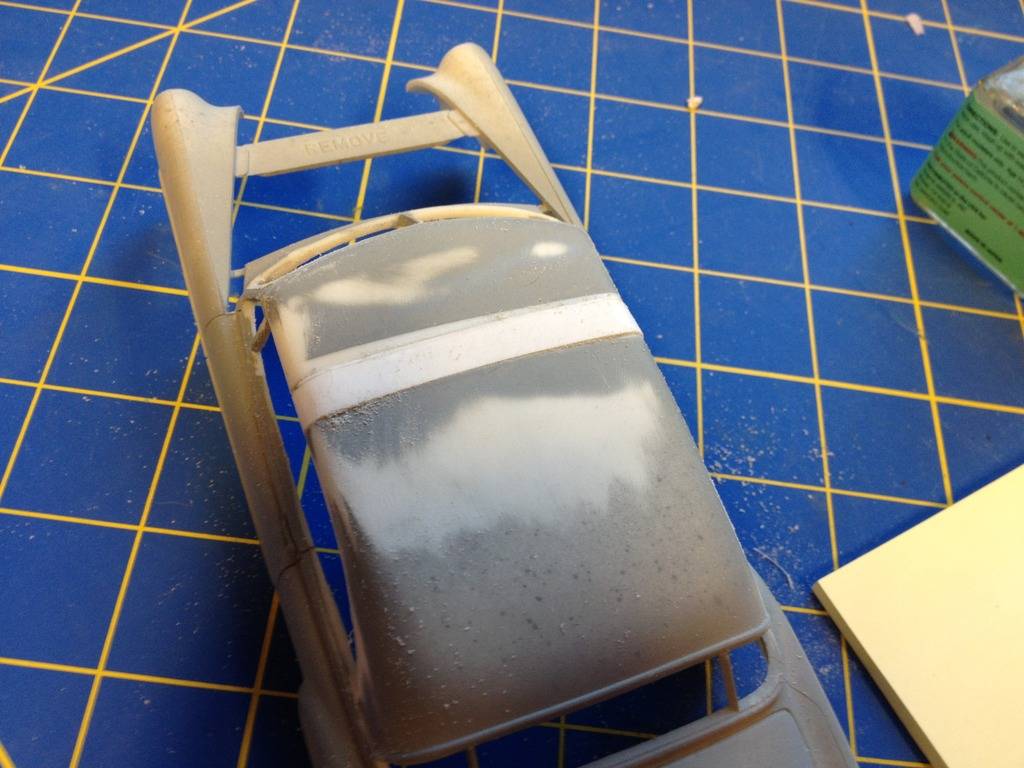
you can see the high spots ( where the primer is gone ) and the low spots ( where you can still see the primer )
the goal will be to get both of these on the same plane so it is smooth
while i use spot putty for the shallow smaller bits, an area this large i tend to use 2 part automotive body filler. it does not shrink over time and sets up to be sandable in about 20 mins.

after the initial sanding

most of it is smooth right now so i will use the spot filler to take care of the little remaining bits
gonna let that set up for a bit and hopefully get back to it later today
i have a shower to install but i should still get a bit of time on my day off in the dungeon
cya soon
did some rough sanding and if i were smart i would have added a bit more crown to the roofline as it would have made the job easier, but who said i was smart??? shurrup tina!! lol
as it sits, after the rough sand, i can see the depression i have to fill to smooth things out
also while i am at it i am going to remove the current molding and replace it once the chop is done with .020 round rod
front window molding is to be replaced as well
after a bit of file work to clean up the sides a bit i check the profile to see if it is heading in the right direction
yup, it is
now a closer look at the depression in the roof
you can see the high spots ( where the primer is gone ) and the low spots ( where you can still see the primer )
the goal will be to get both of these on the same plane so it is smooth
while i use spot putty for the shallow smaller bits, an area this large i tend to use 2 part automotive body filler. it does not shrink over time and sets up to be sandable in about 20 mins.
after the initial sanding
most of it is smooth right now so i will use the spot filler to take care of the little remaining bits
gonna let that set up for a bit and hopefully get back to it later today
i have a shower to install but i should still get a bit of time on my day off in the dungeon
cya soon
- Custom Mike
- Posts : 273
Join date : 2015-01-26
Age : 60
Location : North Carolina
Re: 51 Chevy Custom
Thu Mar 19, 2015 2:20 am
See, stuff like that is why I've avoided chops, it's so easy to screw up and get a weird looking roof. But like you said, it's just plastic, and Bondo and me are good buddies...I'm gonna have to do it soon!
 fletch
- Posts : 250
Join date : 2015-01-25
Age : 53
Location : Maryland
Re: 51 Chevy Custom
Sun Mar 22, 2015 9:53 pm
It is looking pretty good, so far. 
 Gary Parker
- Posts : 29
Join date : 2015-03-23
Location : Denver , Co.
re; 51 Chevy Custom
Tue Mar 24, 2015 2:21 am
Good Work Sir. I'd like to get that kit just to try it., Of course I'd follow your Tutorial to the "t" LOL. Excellent pictures & explanations for all steps!! You've just convinced me to go get 1 & do it ,Seriously ,Thank you Mr. Kitbash. GOD BLESS!!!
Permissions in this forum:
You cannot reply to topics in this forum|
|
|